
To create an ORCID profile, you can follow the steps below.
- Go to https://orcid.org/register register.
- Enter your name and university e-mail address.
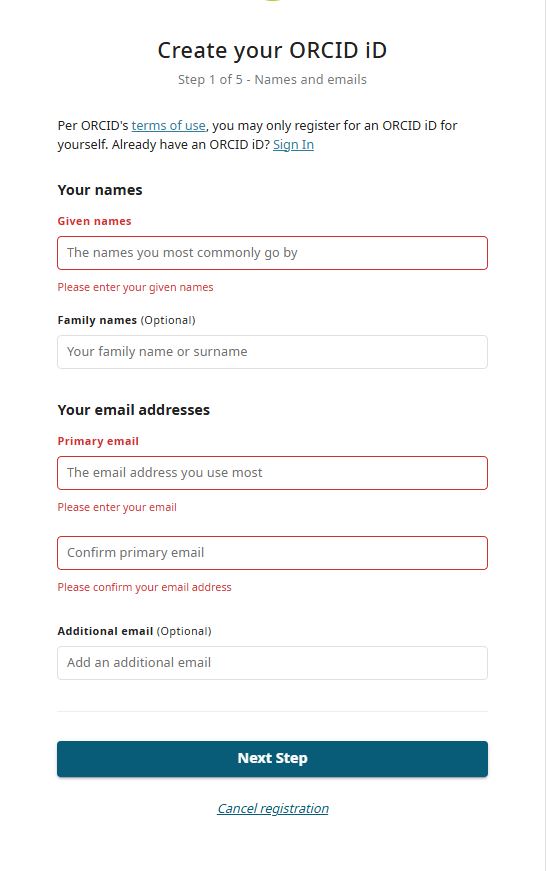
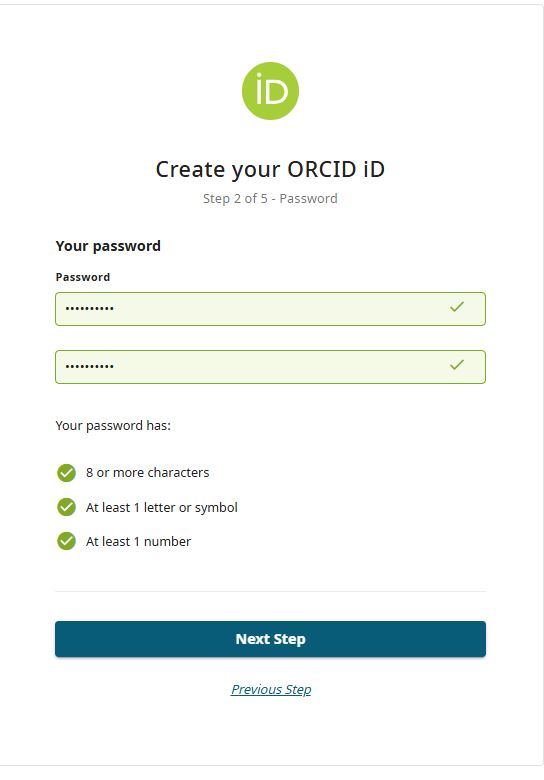
- Create the password you want to use.
- Confirm your password and click on the ‘’Next Step’’ option.
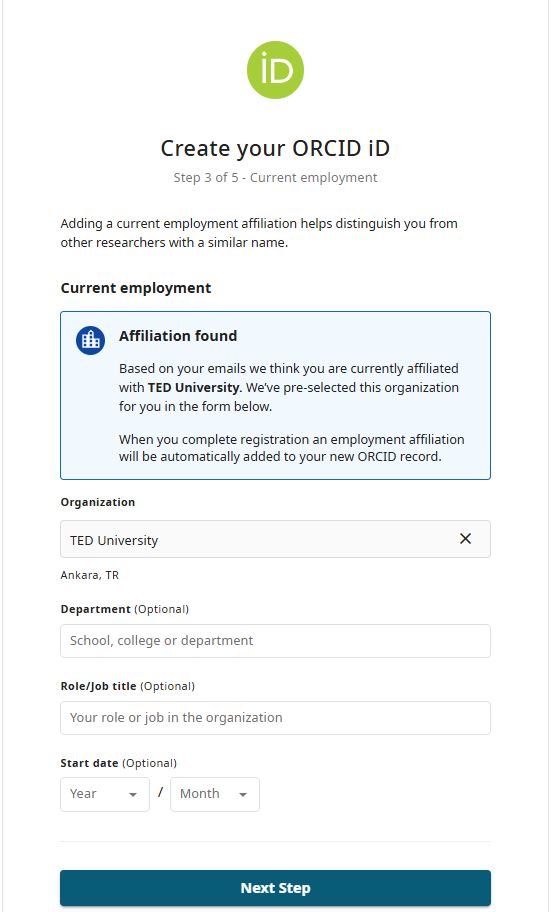
- If you use your university e-mail address to create an ORCID ID, your university information will be automatically sent.
- Enter your department, title and start date.
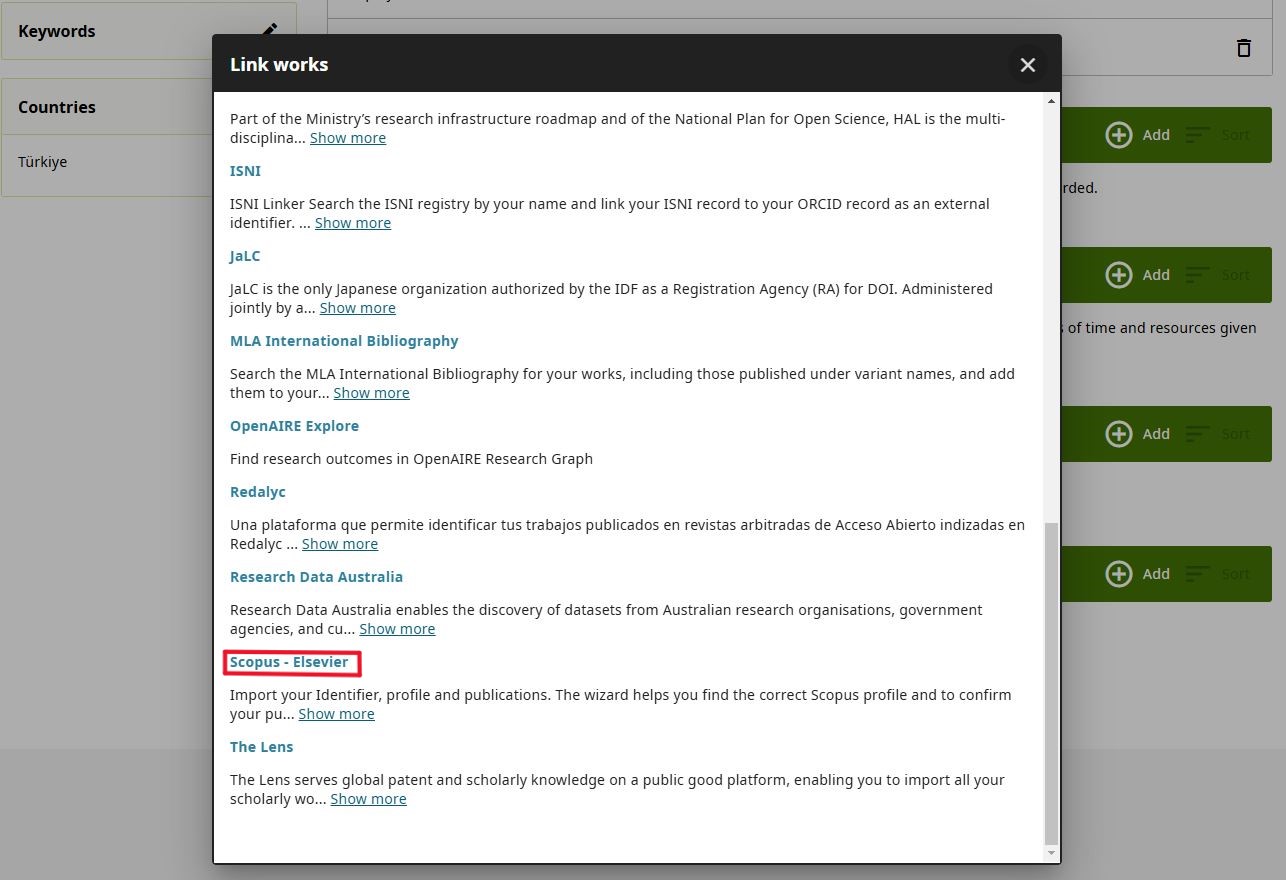
Link Scopus Author ID from ORCID and Add Work
Enter your ORCID profile.
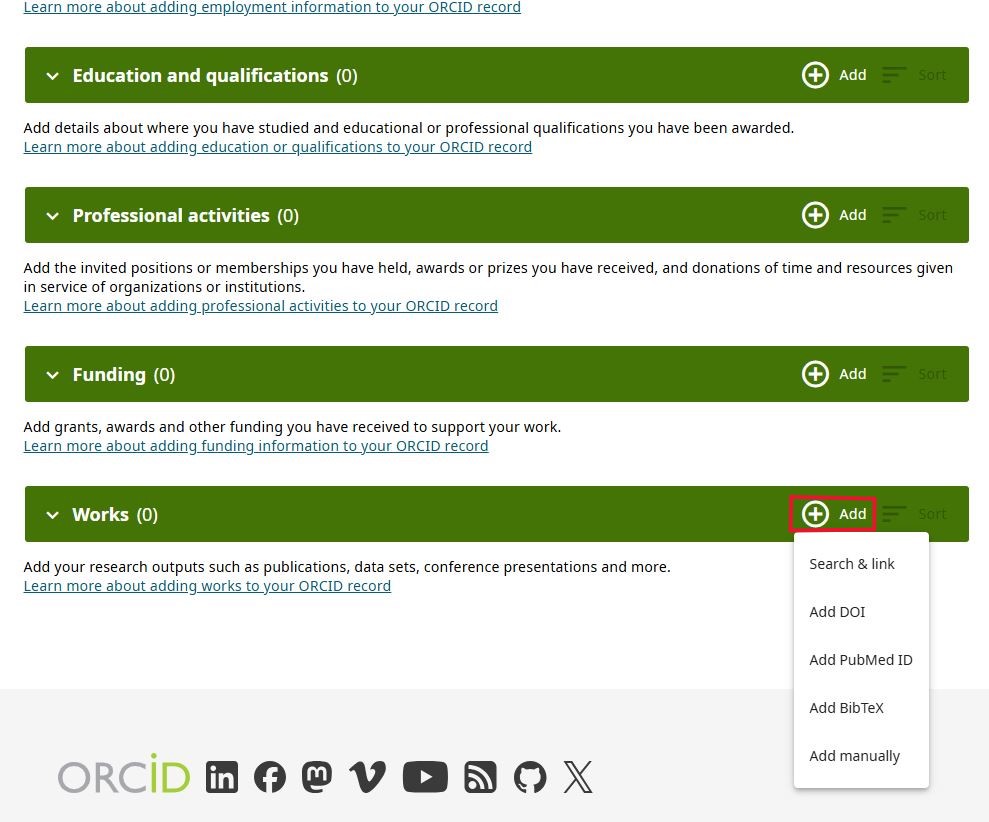
- In the “Works” section, click “Add” and then “Search and link” to proceed.
- To associate your work with your Scopus and ORCID profile, you must follow the steps on the page that appears.
To create web of sciences profile go to https://www.webofscience.com/
Click on the “Register” option on the top right of the screen.
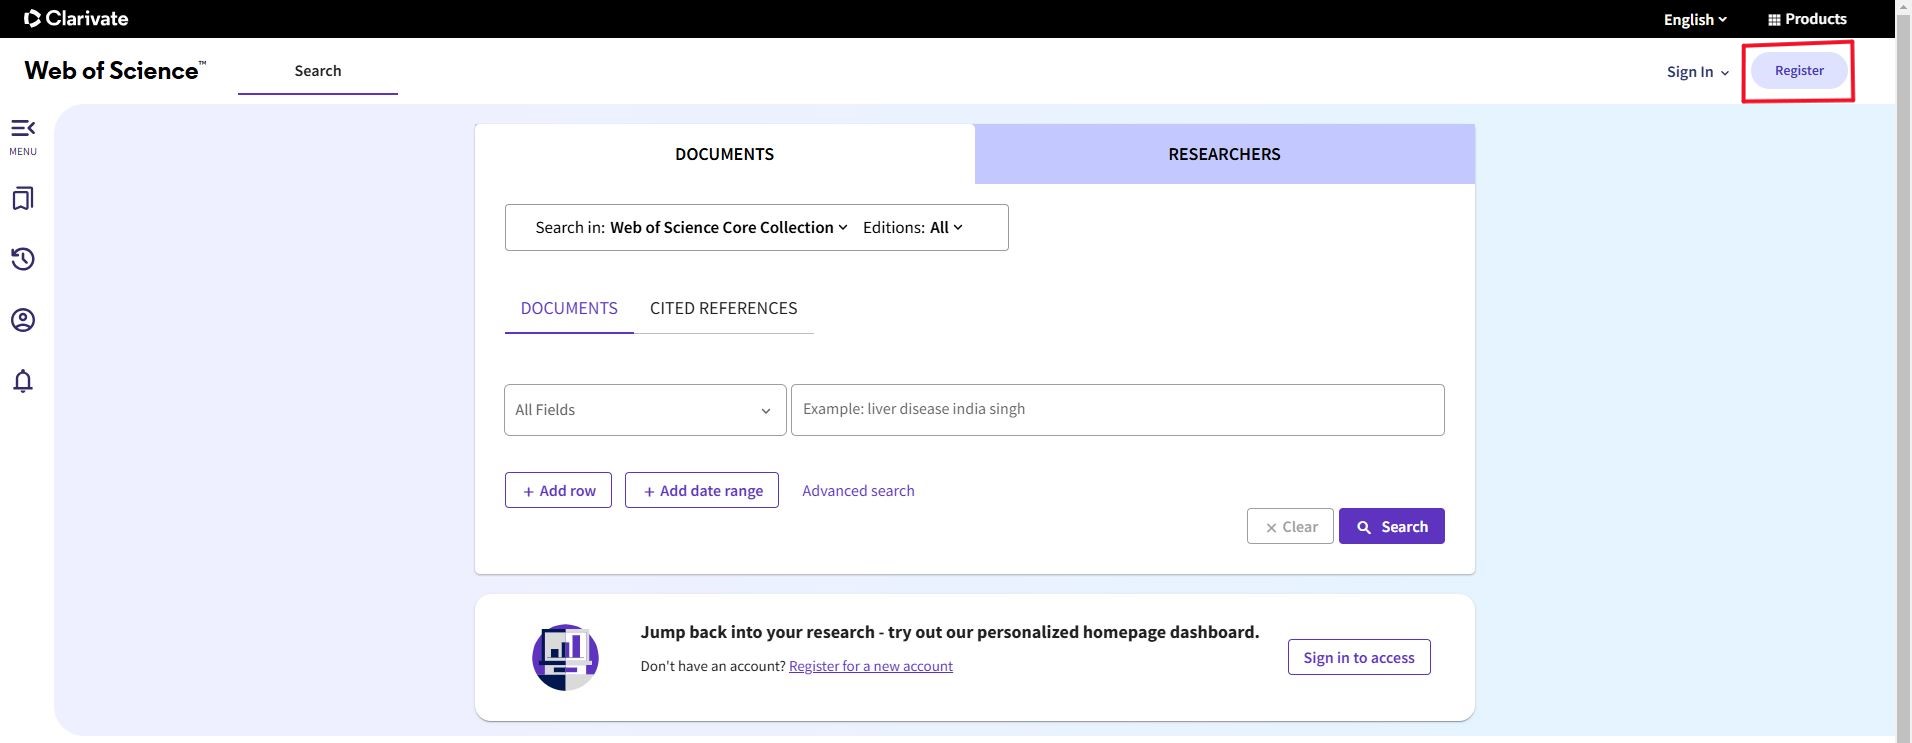
Enter the requested information on the screen that appears. (Use your university e-mail address.)
Creating a Web of Science Account
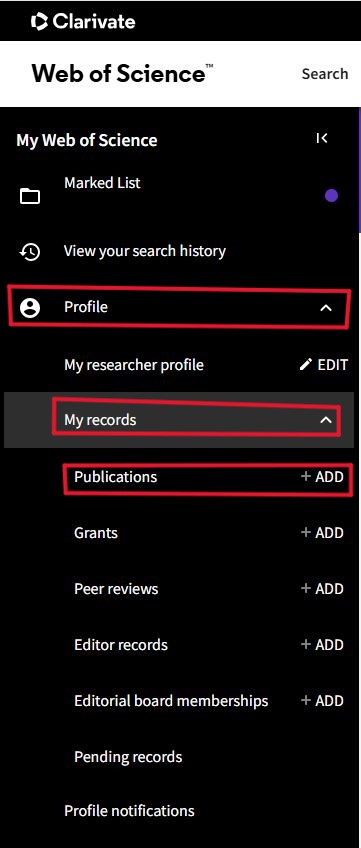
If you have a Web of Science account but do not know your ResearcherID, you can view your ResearcherID by clicking on “My Researcher Profile” under the “Menu” option on the right side of the screen.
Web of Science automatically searches for publications that match your name/e-mail address and adds them to your profile.
Creating a ResearcherID in Web of Science
If you have a web of sciences profile but not created an researcher profile before, Go to https://www.webofscience.com/ and log in to your account and click on “create” to the right of “Profile” under the “Menu” option on the right side of the screen. After this stage, an e-mail containing your ResearcherID will be sent to your university e-mail address. In this way, your ResearcherID and profile creation process is completed.


Web of Science Manual Publication Addition Process
Click on the “Profile” heading under “Menu” on the left side of the screen and make relevant additions and edits from the “My Records” tab.
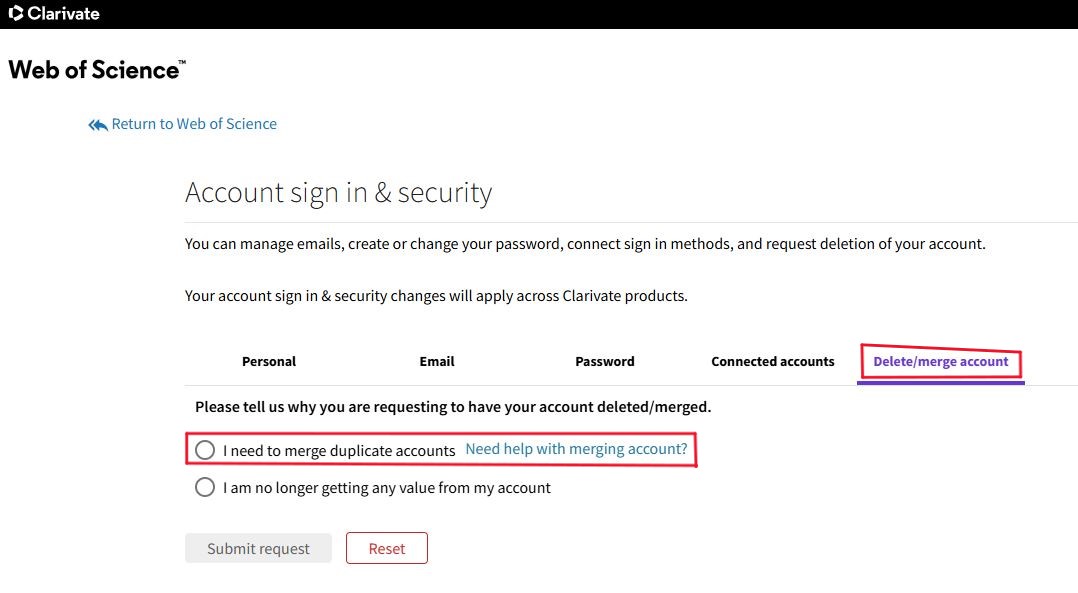
Web Of Science - Merge Duplicate Researcher Profiles
Go to https://www.webofscience.com/ and log in to your account.
NOTE: To perform transactions off-campus, configure your off-campus access settings. To configure your off-campus access settings, please click here.
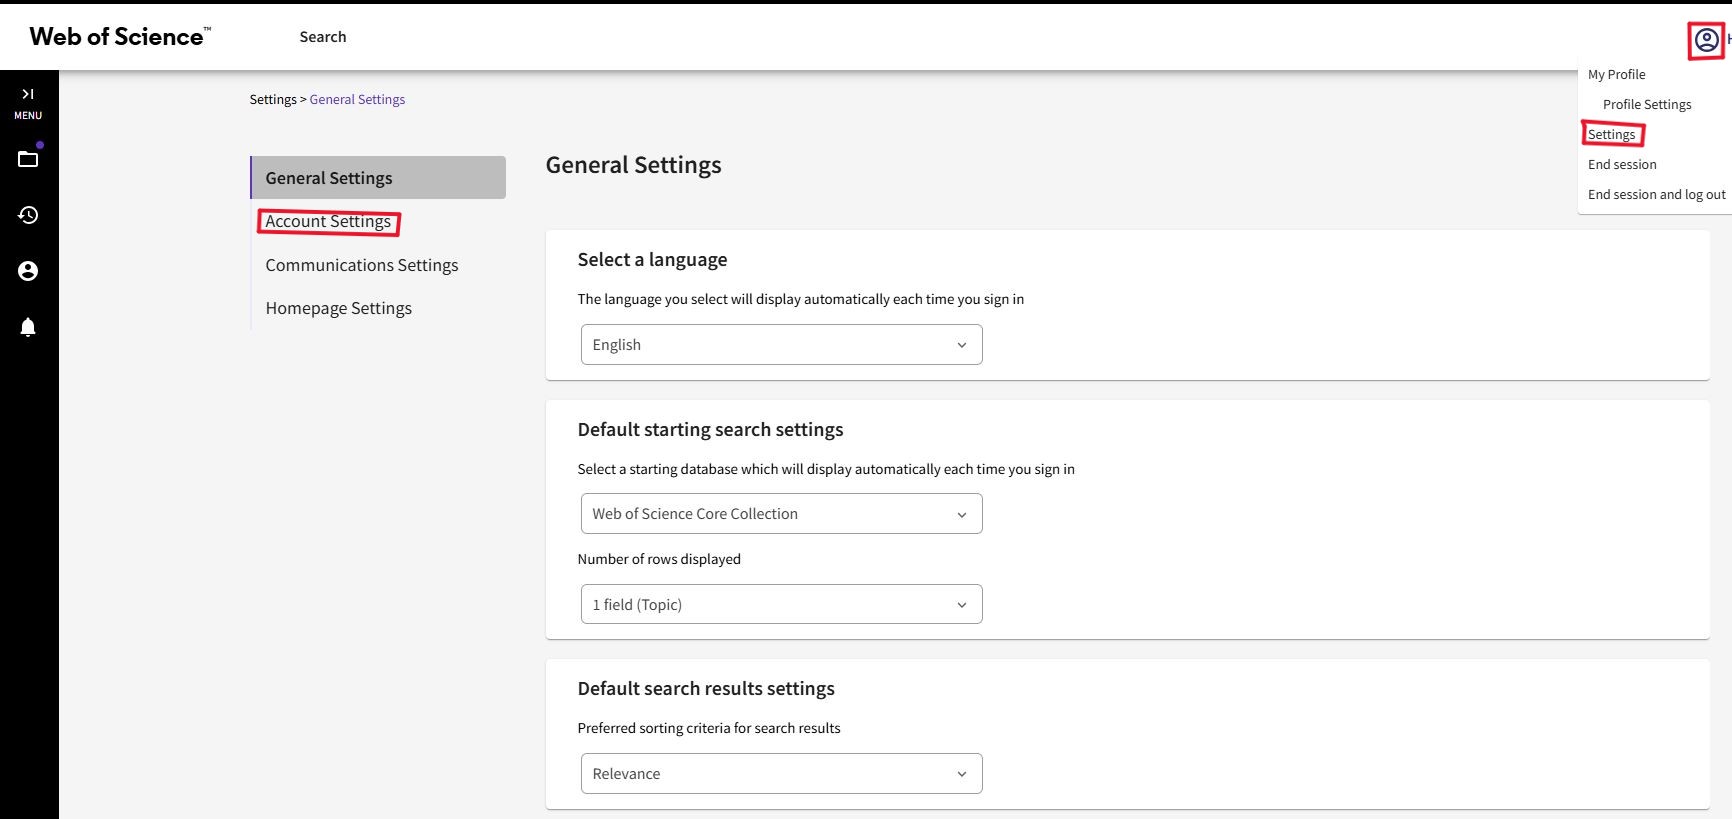
Click on your profile at the top right of the screen, click on “Settings” and then “Account Settings”.
Click “Delete/merge account”.
Check the “I need to merge duplicate accounts” option and submit your request to merge duplicate profiles. After submitting your request, Web of Science will send you an email to complete the process.
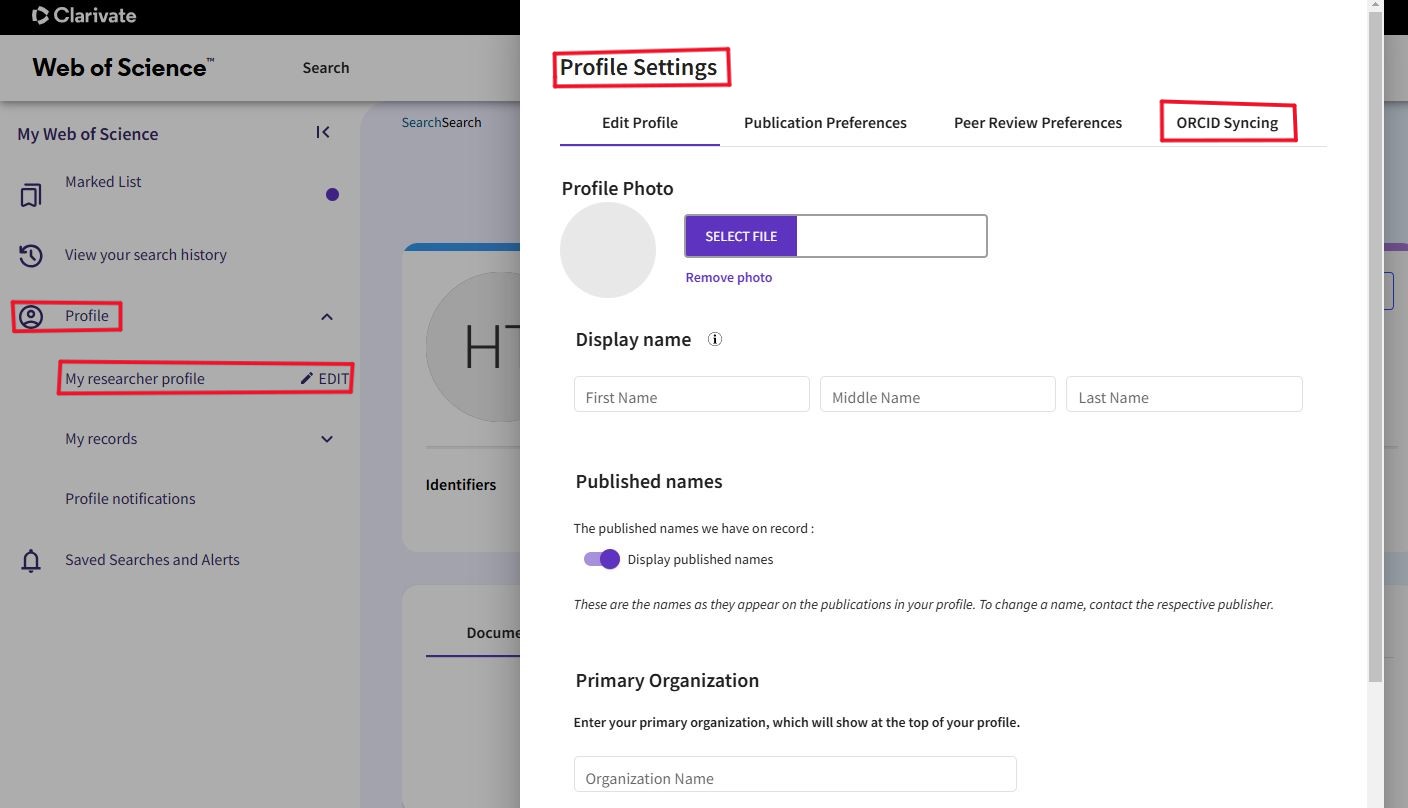
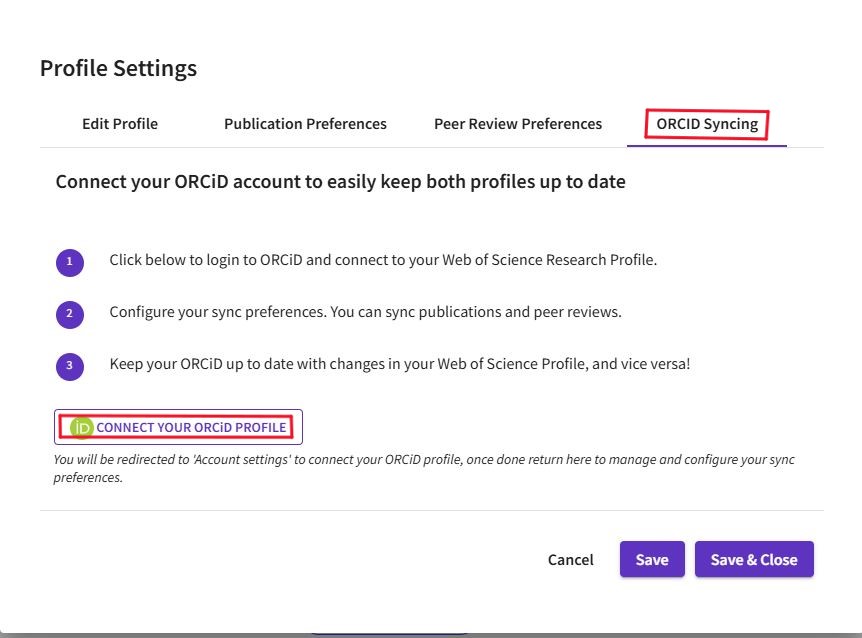
ORCID Synchronization with Web of Science Researcher Profile
After logging into your Web of Science account, click on Profile>My Researcher Profile>Edit>Profile Settings>ORCID Syncing from the “Menu” option on the left side of the screen.
You can complete your synchronization process by clicking on the “Connect your ORCID ID” heading at the bottom of the screen under the “ORCID Syncing” heading.
Scopus Researcher/Author Profile
Scopus Researcher/Author Profile
Go to https://www.scopus.com/search/form.uri?display=basic#basic.
Scopus Author Profile can be indexed in Scopus and is automatically created when you publish.
Scopus automatically creates your identity based on your name, email, institution, subject area and citations.
Note: If you do not have a work indexed in Scopus, you do not have a Scopus ID. In this case, you cannot register for a Scopus ID or request an ID.
Note: In order to perform transactions off-campus, you must configure your off-campus access settings. To configure your off-campus access settings, please click here.
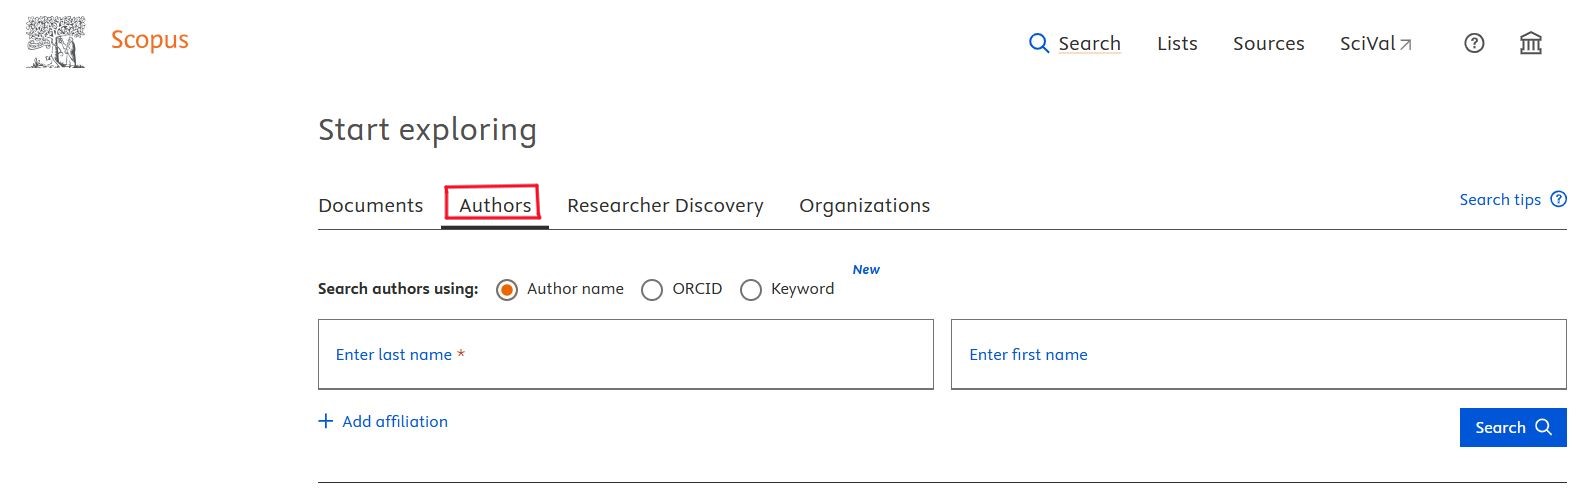
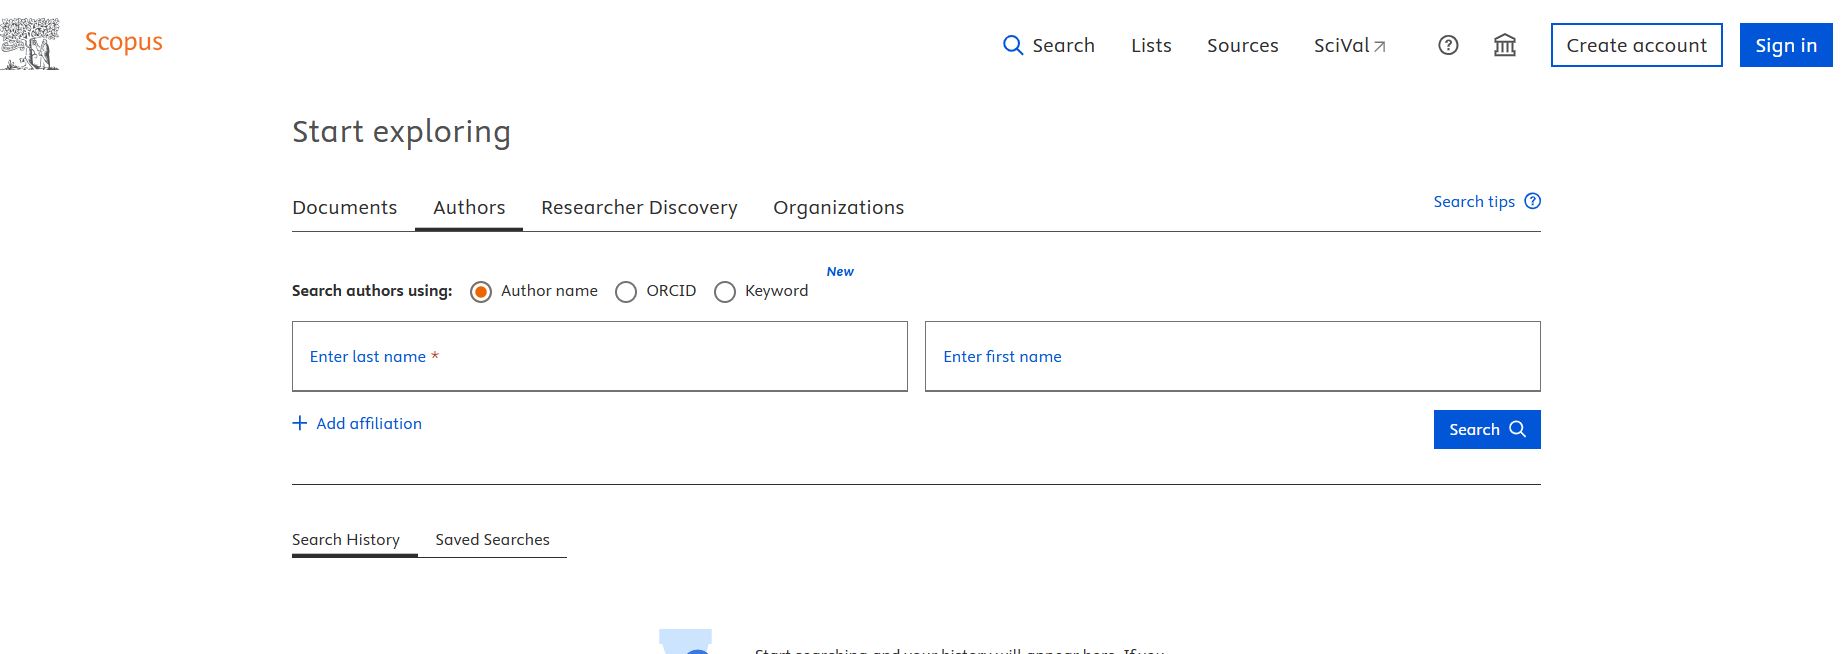
Finding a Scopus ID
Enter your name in the Scopus Authors search field and click the search button.
All authors with works with the same or similar names as you in Scopus are shown.
If you see multiple Scopus IDs associated with your name, you can merge them into one.
If you are publishing under different and multiple names, you will need to search and review the profiles to check and merge the information for each name.
Making Changes to Scopus ID
You will need to create an Elsevier account to request changes to your author profile.
An Elsevier account is not a profile or identity. It gives you access to more features in Scopus and other Elsevier products.
After logging in to Scopus, click on the “Create Account” option in the top right corner of the page. Select Sign in through your institution to create your account and log in with your institution’s Off-Campus Access system.
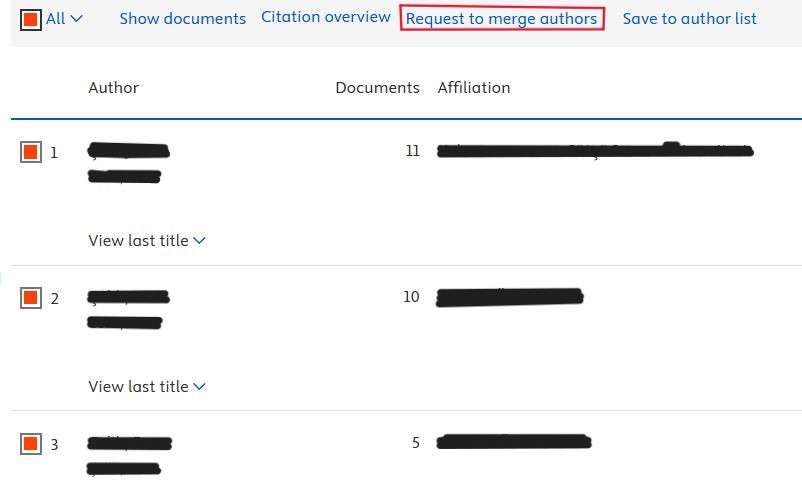
Merging Multiple Identities in Scopus
When you search for an author, you may encounter more than one ID assigned to your name.
This may occur due to publications you made with different first and last names or at different institutions.
Merging Identities with Search Results
If you encounter more than one name in the search, the steps you need to take are to click on the names that appear to open their profiles and check whether your work is listed.
Select the boxes next to the Author name you want to merge in the search result and then select “Request to merge authors” at the top of the results.
Merging Potential Author Matches
Scopus displays other profiles similar to yours in the "Potential Author Matches" section. You can review these profiles to identify those that belong to you and request that they be merged with your own profile.
Potential author matches also display some profiles that are similar to yours. You can view similar profiles. If the profile belongs to you, you can request that it be merged with your ID.
For more information, use the “Scopus Author Feedback Wizard”.
After you request an author merge, it can take a few weeks for your profile and ID to be updated.
For more information, see the guide titled “Scopus Process After Submitting a Missing Content or Data Correction Request”.
Profile Update and Editing
You can use your Elsevier account to edit your author profile.
Click “Edit profile” to update your name, institution affiliation, and add/remove publications from your profile.
You can change your current affiliation by clicking on “Authors details” and select the institution you want.
You can select names that have been published and indexed in Scopus by searching for the author name. After selecting “Review changes”, "Submit request” to submit the change for review by Scopus.
Adding an Item/Publication
To add a study that already exists in Scopus, follow these steps:
Open “Documents” in the Author Feedback Wizard.
Click on “Search for missing documents on Scopus” in “Documents”.
Search to find the item/publication and select “Confirm author”.
You must select the author associated with the document. After clicking on “Add document”, click on “Review changes”.
Select “Submit request” to submit the change for review by Scopus.
Removing a Study
Open “Documents” in the Author Feedback Wizard.
Click on “Search for missing documents on Scopus” in the “Documents” section.
Select the items that do not belong to you in the list.
Click on “Remove from profile” and then “Review changes”.
Select “Submit request” to submit the change for review by Scopus.
After the request, Scopus will review it and either approve or reject it.
Linking Your Scopus Author Profile to ORCID
Linking your Scopus Author ID to your ORCID profile allows you to transfer publication details from Scopus to your ORCID profile.
Linking Your Scopus Author ID to ORCID
Search for your name and TED University in the “Affiliation” field in the Scopus “Author” section.
Select your name in the results list to open your profile page. (Please note: If you do not have a study indexed by Scopus, you will not be able to find the Author ID.)
If you have an Author ID, click on the “Connect to ORCID” option.
Follow the steps on the page that appears to associate your Scopus author profile with your ORCID account.
Adding Studies Found in ORCID to Scopus
Log in to your ORCID account.


Creating a Google Scholar Researcher Profile
You can follow the steps below to create a researcher profile on Google Scholar
To perform transactions related to your Google Scholar account, go to https://scholar.google.com/schhp?hl=tr.
Click on the “My Profile” button at the top of the page.
You must log in with your Google account. If you do not have a Google account, you must create a new account.
Editing a Google Scholar Researcher Profile
After logging in to your account, enter your name, institution you are affiliated with, and institutional e-mail address. Upload a suitable photo to make your account look professional.
Add keywords related to your research areas to your profile by entering keywords. The keywords you add to your profile help you stand out as an author.
To make your profile visible to others, check the “Make my profile public” box in the settings section.
Regularly update the changes in the publications and research interests in your profile.
Adding Publications
Google Scholar automatically suggests articles that it thinks may be yours. Review the suggestions that appear and add the studies that belong to you to your profile.
If you have missing publications, click on the “+” button and use the “Manual article addition” option. Fill in your publication information completely.